Talk Dirty to Me: On Season Extension, Sweet Potatoes and Making Bacon
Fall 2013
What’s the best way to grow in cold weather? Row covers? Grow box? Greenhouse?
Kelly Tuttle – Kansas City, MO
Winter food production is a “hot” topic these days. More and more market farmers and home gardeners are looking for ways to extend the season. That said, the basic idea of how plants grow in the off-season is widely misunderstood. To be clear, it is not necessarily cold temperatures that make it impossible for crops to be grown in the winter. It is in fact the lack of day light hours that prevent growth. Plants need a certain amount of light to grow. Once the Fall Equinox comes in late September, the days start getting shorter. As daylight decreases, plants grow slower and slower until they no longer have enough light to grow at all. Therefore, you are never really “growing” food in the winter – rather you are harvesting food that is holding in protected conditions like a greenhouse or high tunnel, grow box, or in the field under row cover. Although a high tunnel (similar to an unheated green house) is the most sophisticated way to extend the growing season, not everyone has access to such a structure (myself included). I choose to grow in the field using multiple layers of floating row cover to protect my cold hearty greens & roots. Row cover is a translucent white fabric that is draped over crops and secured with metal “field staples”. The row cover comes in several thicknesses and keeps crops warmer by several degrees depending on the grade. Two layers of row cover is usually sufficient to protect spinach, lettuce, Asian greens, mustards, kale, turnips, winter radishes, beets & carrots during the coldest times. A third layer can be added if necessary. I like to create a “low tunnel” using metal hoops. This keeps the row cover from directly contacting the crops as the row cover itself can collect frost and damage greens. To further protect crops, one can create an even warmer microclimate by lining the exterior of the low tunnel with straw bales or filled leaf bags. (This does however make it more difficult to access your crops when harvesting).
The most important part about winter production is the timing of your plantings. Crops must be seeded early enough in the fall so that they put on enough growth before the days get too short. Seed enough greens so that you may cut on them all winter long understanding that they won’t necessarily grow back until the spring. Beets & Carrots really ought to be seeded in mid August. Turnips & Watermelon Radishes should be seeded no later than the first week of September. Greens should be seeded not much past mid September.
Keep in mind, winter production can be very tricky! Practice makes perfect so try a variety of crops and a variety of methods and through a bit of trial and error you will find a method that works well for you. Lastly, don’t forget how our ancestors have always fed themselves through the cold months – storage crops! Instead of attempting to grow in less than ideal conditions, homesteaders grew enough potatoes, onions, garlic, winter squash, carrots, turnips, and beets to last them until spring. If stored correctly, these nourishing foods can be enjoyed until the garden is bountiful yet again.
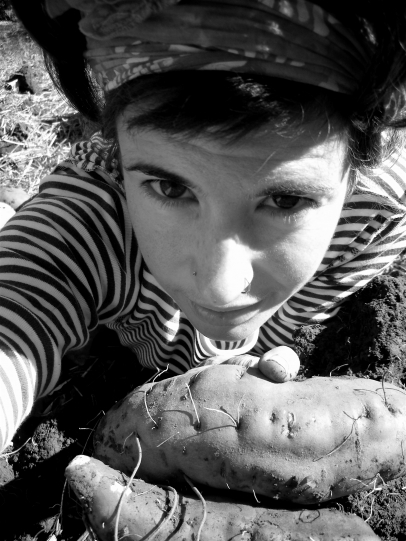
When should I dig up my sweet potatoes, and is there a special way you have to store them so they don’t get soft?
Pam Hamilton – Raytown, MO
Sweet Potatoes need to be dug before the first frost. At URBAVORE we try and give our precious tubers as much time as possible to size-up before we harvest. The first frost can be as early as mid October so we keep an eye on the ten-day forecast and proceed accordingly. Most years we have them out of the ground before we plant garlic in mid to late October.
To correctly store sweet potatoes, they must be cured first. This is a fairly simple process that will not only improve the storage life of your potatoes, but it will also improve the taste! Gently wash your sweet potatoes after digging to remove any dirt which can harbor disease. Place them on a rack or in crates in a small room. Cure at 84 degrees with 90% humidity for 10 to 14 days. My set-up is not glamorous – it includes a space heater and several 5 gallon buckets of water for moisture. Once adequately cured the starches of your taters will have turned to sugar and any bruises will have healed over. Place cured taters in a cool, dark, dry place and enjoy through the winter!
I ordered half a pig from my farmer and was thinking of curing the bacon myself. Do I need any special equipment?
Ed Austin – Kansas City, KS
Although I’ve never cured bacon personally, I hear it is incredibly easy. I raise chickens and ducks for eggs and occasionally harvest them for meat. I often brine the birds before roasting them and curing bacon is not much more complicated. No fancy equipment is needed. You will simply need curing salt (sodium nitrate), flaked salt, black pepper and your choice of spices, herbs, and sweetener. Most recipes call for either honey, maple syrup or brown sugar. Thyme, bay leaves, nutmeg, and garlic are also welcome additions. Find a recipe that sounds good and go for it! For inspiration you might visit KC’s renowned Charcuterie – The Local Pig in the east bottoms (www.thelocalpig.com) – also covered as a feature story in the First Serving of edible KANSAS CITY last spring. Their staff of talented butchers might share some bacon curing secrets.
Send your gardening, homesteading, cooking, and “green” lifestyle questions to askbrooke@ediblekansascity.com.